

In this article, we will learn about 3 unique DIY Indoor light decoration ideas. Indoor lighting plays a crucial role in creating a warm and inviting atmosphere in our homes. While there are numerous lighting options available in the market, nothing adds a touch of personalization and creativity quite like do-it-yourself (DIY) indoor light decorations. These projects allow you to infuse your living space with a unique ambiance that reflects your style and personality. Let’s dive straight in!
Table of Contents
- The DIY Indoor light decoration ideas
- Fairy Light Photo Display
- DIY Mason Jar Lantern
- Wine Bottle Chandelier
- Conclusion
The DIY Indoor light decoration ideas
Fairy Light Photo Display
A DIY Fairy Light Photo Display is a creative and charming way to showcase your favorite photographs or memories using fairy lights. This project combines the warm glow of fairy lights with personal photos to create a unique wall decoration. Here’s how you can make your own Fairy Light Photo Display:

Materials you will need
- Fairy lights (string lights with a battery pack)
- Mini clothespins
- Polaroid photos, postcards, or printed photographs
- Command hooks or adhesive tape (to hang the fairy lights)
Step-by-step instructions:
- Plan your layout: Decide where you want to hang your Fairy Light Photo Display. Choose a wall that will allow you to create a cascading effect with the fairy lights. Measure the area and consider how many photos you want to display.
- Hang the fairy lights: Start by attaching the fairy lights to the wall. You can use removable adhesive hooks or tape to secure them in place. Create a crisscross pattern or any arrangement that suits your taste. Make sure the battery pack is easily accessible for turning the lights on and off.
- Attach the mini clothespins: Take the mini clothespins and evenly space them along the length of the fairy lights. Use the clothespins to clip your chosen photos, postcards, or Polaroid. You can use a mix of different-sized photos or stick to a specific theme.
- Arrange and adjust: Once you’ve clipped your photos, take a step back and evaluate the arrangement. Rearrange the pictures as needed to achieve a balanced and visually appealing display. You can also adjust the length of the fairy lights by twisting or looping them to create a draped effect.
- Power up: Insert fresh batteries into the battery pack and turn on the fairy lights. Watch as your cherished memories come to life with a beautiful warm glow.
Tips for a successful Fairy Light Photo Display:
- Select images that are meaningful to you or evoke happy memories. Polaroids or vintage-style prints work particularly well for a nostalgic feel.
- Try different configurations of fairy lights and photos to find the arrangement that you love. You can create a straight line, a zigzag pattern, or a waterfall effect.
- The wall color and texture can enhance the overall look of your display. Opt for a neutral background to allow the photos and lights to stand out or choose a complementary color to create a cohesive aesthetic.
- You can personalize your Fairy Light Photo Display further by incorporating other decorative elements such as paper cutouts, small trinkets, or dried flowers. Let your creativity shine!
- Remember to periodically change the photos to keep the display fresh and up to date with your latest memories. Enjoy the warm ambiance and the personal touch that the Fairy Light Photo Display brings to your space.
Check out our blog on 5 creative ways to Decorate Room with Fairy Lights for more creative ideas.
DIY Mason Jar Lantern
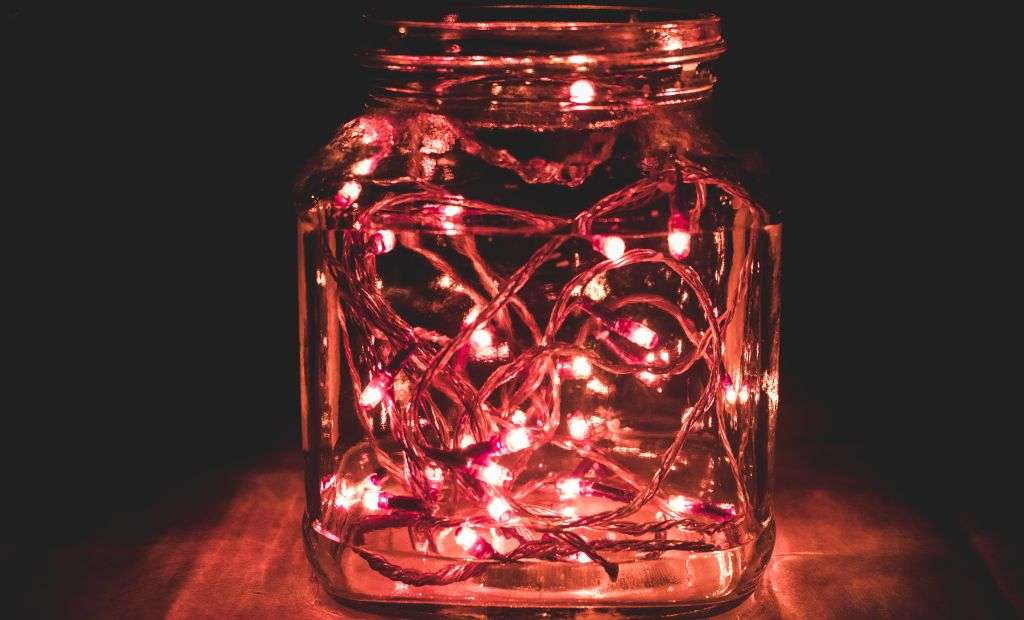
DIY Mason Jar Lanterns are charming light fixtures made from repurposed mason jars and fairy lights. This is our personal favorite DIY Indoor light decoration idea. They add a cozy and rustic touch to any space. Here’s a step-by-step guide on how to make your own Mason Jar Lanterns:
Materials you will need:
- Mason jars (clean and empty)
- Fairy lights (string lights with a battery pack)
- Twine or wire
- Scissors
Step-by-step instructions:
- Prepare the mason jars: Ensure that your mason jars are clean and dry. Remove any labels or residue from the jars using warm soapy water. Dry them thoroughly before proceeding.
- Arrange the fairy lights: Take the fairy lights and carefully untangle them. Gently stuff the lights into each mason jar, making sure the battery pack is left outside the jar. Fill the jar with fairy lights, leaving some space at the top.
- Secure the battery pack: Place the battery pack of the fairy lights at the bottom of the jar. You can either let it rest on the surface or use a small piece of adhesive putty or tape to keep it in place.
- Attach twine or wire: Cut a length of twine or wire, long enough to wrap around the rim of the mason jar. Wrap the twine or wire around the jar’s neck, making sure it is secure and tight. You can wrap it a few times for added stability. Leave extra twine or wire on one side to create a loop for hanging.
- Create a hanging loop: Take the extra twine or wire and loop it around, forming a secure handle for hanging the lantern. Tie a knot or twist the ends together to secure the loop in place.
- Test the lights: Insert fresh batteries into the battery pack and turn on the fairy lights. Ensure that the lights are working properly before hanging the lantern.
- Hang the lanterns: Find a suitable spot to hang your Mason Jar Lanterns. You can hang them individually or in a cluster using hooks, nails, or any other secure hanging mechanism. Make sure the hanging arrangement is sturdy and won’t cause any accidents.
- Optional: Decorate the jars (optional): If you want to add extra flair to your Mason Jar Lanterns, you can decorate the jars with ribbons, lace, or adhesive gems. Get creative and customize them to match your home decor.
- Enjoy the cozy ambiance: Turn off the lights in the room and let your Mason Jar Lanterns illuminate the space with their warm and enchanting glow.
Tips for making Mason Jar Lanterns:
- Experiment with different jar sizes: Mason jars come in various sizes, so feel free to mix and match different jar sizes to create an interesting visual display.
- Use colored or tinted jars: For a more unique look, consider using colored or tinted mason jars. These can add a subtle hue to the light emitted by the fairy lights.
- Battery-powered vs. plug-in lights: While battery-powered fairy lights are convenient for this project, you can also use plug-in lights if you have a nearby power source and prefer not to deal with batteries.
- Hang them indoors or outdoors: Mason Jar Lanterns work beautifully both indoors and outdoors. They can create a cozy atmosphere on a patio or add a rustic touch to a living room or bedroom.
- Mason Jar Lanterns are a versatile and budget-friendly DIY project that can instantly enhance the ambiance of any space. Get creative and enjoy the warm and magical glow they bring to your home!
Wine Bottle Chandelier
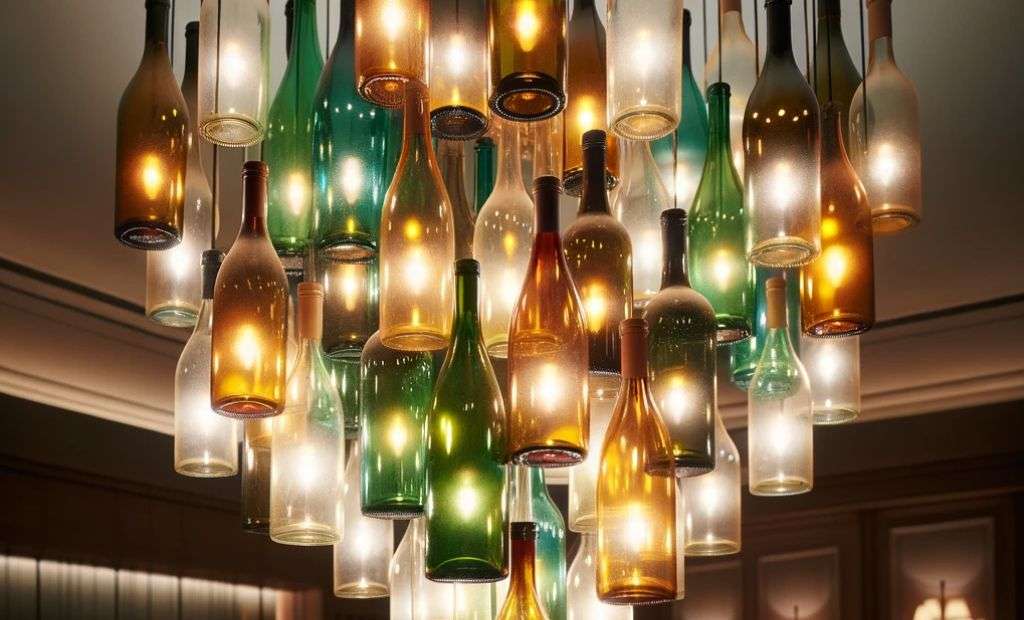
A Wine Bottle Chandelier is a unique and eye-catching DIY Indoor light decoration idea made from repurposed wine bottles. It adds a touch of elegance and creativity to any space. Here’s a step-by-step guide on how to make your own Wine Bottle Chandelier:
Materials you will need:
- Empty wine bottles (cleaned and labels removed)
- Fairy lights (string lights with a battery pack)
- Wooden board or metal frame
- Drill with appropriate drill bits
- Ceiling hooks and chains (if needed)
- Wire or metal brackets
- Screws or cable ties
- Optional: Paint or decorative elements for the bottles
Step-by-step instructions:
- Prepare the wine bottles: Make sure your wine bottles are thoroughly cleaned and dried. Remove any labels or residue from the bottles using warm soapy water. Dry them completely before proceeding.
- Optional: Decorate the bottles (optional): If desired, you can paint the wine bottles in colors of your choice or add decorative elements such as adhesive gems, ribbons, or twine. Let your creativity shine!
- Drill holes in the bottles: Using a drill with an appropriate drill bit for glass, carefully drill a hole in the bottom of each wine bottle. Take your time and use gentle pressure to prevent the bottles from cracking or breaking. These holes will allow the fairy lights to pass through the bottles.
- Thread the fairy lights through the bottles: Insert the fairy lights into each wine bottle through the hole you drilled. Start with the battery pack end and thread the lights all the way through, leaving the battery pack outside the bottle.
- Secure the bottles to the board or frame: Determine the layout and arrangement of the wine bottles on your chosen wooden board or metal frame. Once decided, use wire or metal brackets to secure the bottles in place. Wrap the wire or attach the brackets around the necks of the bottles, ensuring they are tightly secured.
- Attach the board or frame to the ceiling (if applicable): If you’re planning to hang the chandelier from the ceiling, use ceiling hooks and chains to suspend the board or frame. Ensure that the hooks and chains can support the weight of the chandelier.
- Conceal wires (if desired): If you want to hide the wires, use screws or cable ties to secure them along the board or frame, keeping them neatly arranged and out of sight.
- Test the lights: Insert fresh batteries into the battery pack and turn on the fairy lights. Make sure all the lights are working properly and adjust the positioning of the bottles if needed.
- Hang and enjoy: Lift the chandelier and hang it from the ceiling or any desired location using the appropriate hooks or chains. Adjust the height to your preference, and ensure it is securely fastened.
Tips for making a Wine Bottle Chandelier:
- Consider bottle arrangement: Play around with different bottle arrangements and heights to create a visually appealing design. You can group them closely together or create a more spaced-out look depending on your preference.
- Add embellishments: If you want to enhance the aesthetic appeal of the chandelier, consider adding additional decorative elements such as beads, crystals, or ribbons. These can be attached to the bottles or incorporated into the design.
- Use different bottle shapes: Explore using wine bottles of different shapes and sizes to add variety and visual interest to your chandelier.
- Outdoor use: If you plan to hang the chandelier outdoors, make sure the battery pack and electrical components are protected from the elements. Consider using battery-powered waterproof fairy lights for durability.
A Wine Bottle Chandelier is a fantastic way to repurpose wine bottles and create a stunning lighting fixture that will be a conversation piece in any space. Enjoy the unique ambiance and the touch of elegance it brings to your home!
Conclusion
DIY indoor light decorations provide an opportunity to infuse your living space with warmth, personality, and creativity. By incorporating simple materials like fairy lights, mason jars, origami, and recycled objects, you can transform your home into a cozy and enchanting haven. Experiment with different ideas, explore various patterns and designs, and let your imagination guide you as you embark on your DIY lighting projects. Remember, the only limit is your creativity, so have fun and let your light shine bright! For more such informative posts, do check out Indoor Glow.