
Welcome to the world of Cove and Recessed Lighting, where elegance meets functionality in interior design. Both lighting types have their unique charm and utility, enhancing spaces with their distinct lighting effects. They are also a great Ceiling Light option. Cove lighting, with its ambient glow, adds a touch of warmth to rooms, while recessed lighting offers precise and direct illumination. Whether you’re renovating your home or just looking to update your lighting, understanding these options is key to creating the desired ambiance.
Table of Contents
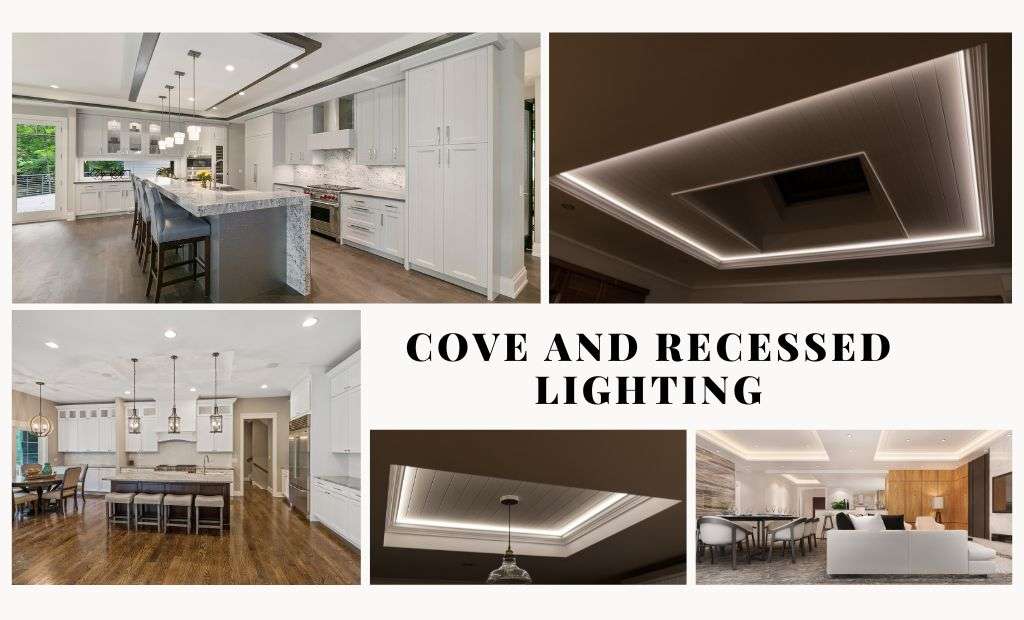
What is Cove Lighting?
Cove lighting is an architectural lighting solution designed to emit a soft, diffused glow. Positioned within ledges, recesses, or valances in a ceiling or high on the walls, it casts light upward and bounces off the ceiling or wall, illuminating the room indirectly. This technique avoids glare and minimizes shadows, creating a warm and inviting atmosphere.
Applications: It’s ideal for creating an ambiance in living rooms, bedrooms, and hallways, as well as commercial spaces like hotels and restaurants. Cove lighting is often used to accentuate architectural features, soften room contours, and enhance the overall aesthetic appeal.
Installation Tips:
- Planning: Measure the area where you want to install the cove lighting. Consider the room’s layout, the desired effect, and the type of cove lighting fixtures you’ll be using.
- Choosing Fixtures: LED strips are a popular choice for their efficiency and ease of installation. Ensure the color temperature and brightness suit your desired ambiance.
- Wiring: Plan the wiring route, keeping in mind the nearest power source. You may need to run wires through walls or ceilings, adhering to your local building codes.
- Installing the Cove: Install the cove or molding if it’s not already in place, ensuring it’s securely attached to the wall or ceiling. The cove should conceal the lighting fixtures from direct view to achieve the desired indirect lighting effect.
- Mounting the Lights: Attach the LED strips or other cove lighting fixtures into the cove. Make sure they’re evenly spaced to avoid uneven lighting.
- Finalizing: Connect the lights to the power source, install any necessary switches or dimmers, and test your cove lighting to ensure everything is working correctly.
What is Recessed Lighting?
Recessed lighting, also known as downlighting, consists of light fixtures installed flush with the ceiling. Each fixture is typically comprised of a housing, trim, and bulb. It directs light downward in a narrow beam, making it ideal for task lighting, general room lighting, or accentuating architectural features or artwork.

Types of Recessed Lights:
- Downlights: Provide a broad beam of light, suitable for general or ambient lighting.
- Gimbal Lights: Feature adjustable trim that can pivot, directing the light to specific areas or objects.
- Wall-washed Lights: Designed to illuminate walls or vertical surfaces evenly.
Considerations for Installation:
- Planning: Identify the areas where you need lighting and the type of recessed lights that best fit those needs. Consider the beam spread and the spacing between each light.
- Choosing the Right Housing: New construction housings are used when accessible from above, usually before the ceiling is finished. Remodel housings are designed for installing after the ceiling is complete.
- Insulation Contact (IC) Rated: If the lighting will come into contact with insulation, use IC-rated housings to prevent fire hazards.
- Cutting Holes: Mark and cut holes in the ceiling where each light will go, following the manufacturer’s specifications.
- Wiring: Run electrical wiring to each hole, adhering to local codes. This step typically involves connecting the fixture to a power source and daisy-chaining between fixtures.
- Installing the Fixture: Secure the housing in the ceiling, connect the wires to the fixture, and then attach the trim and bulb. Ensure that all connections are secure and that the trim fits flush with the ceiling.
Detailed Installation Processes
Installing Cove Lighting:
- Planning and Preparation: Before purchasing, decide on the effect you want to achieve with your cove lighting—soft ambient light or a more pronounced effect. Measure the area to determine how much lighting you’ll need.
- Electrical Preparation: Ensure the power is off. Run electrical wiring to the location of your cove lighting, adhering to all safety standards and regulations. This might involve fishing wires through walls or ceilings and should be done by a qualified electrician if you’re not experienced.
- Installing the Cove or Molding: Fix the cove or molding to your wall or ceiling using appropriate fasteners. Ensure it’s level and securely attached. The cove should be deep and wide enough to conceal the light fixtures.
- Mounting the Lights: Install the light fixtures or LED strips inside the cove. Ensure they are evenly spaced and fully secured. Connect them to the power source and any switches or dimmers you’re using.
- Testing and Adjusting: Once everything is installed, turn the power back on and test your cove lighting. Adjust the position of the lights or dimmer settings until you’re happy with the ambiance.
Installing Recessed Lighting:
- Layout Planning: Determine the number of lights needed and their placement. Use a template (often provided by the manufacturer) to mark the ceiling. Consider the purpose of the lighting (task, general, or accent) and the spread of light each fixture provides.
- Cutting and Wiring: Turn off the electricity. Cut the holes for each light according to the template. Run the electrical cable from the power source to the switch and then to each light location, adhering to safety codes.
- Installing Housings: Secure the housing in the ceiling for each light. If you’re working with insulation, ensure you’re using IC-rated housings. Connect the house wiring to the fixture.
- Adding the Bulbs and Trim: Once the housing is installed and wired, insert the bulb according to the type of recessed lighting you’ve chosen. Finally, attach the trim, which is the visible part of the light.
Better Option Between Cove and Recessed Lighting
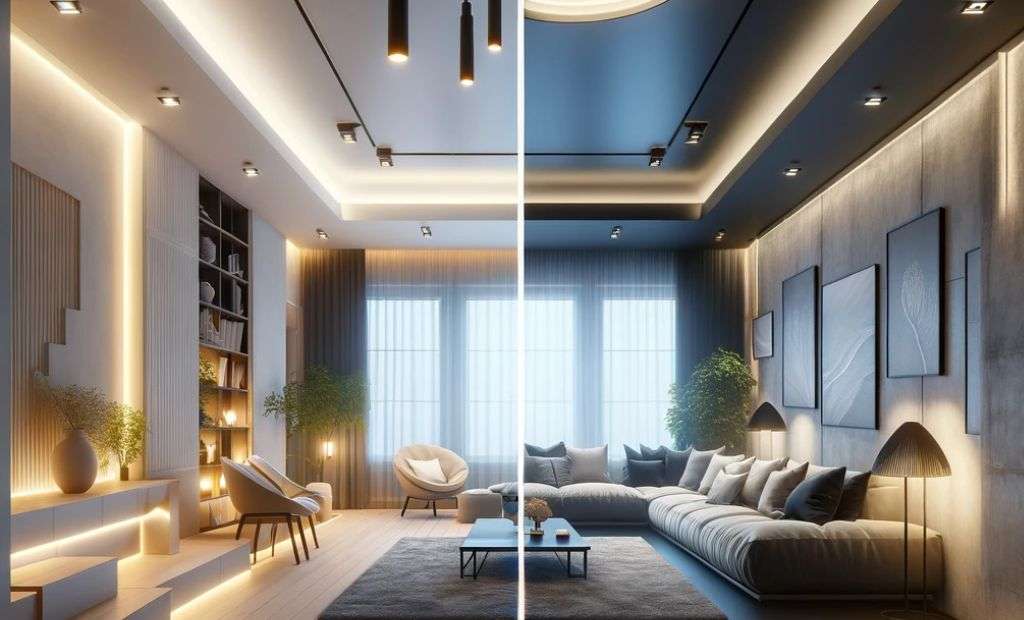
Choosing between cove and recessed lighting hinges on aesthetic preference, functional needs, and installation considerations. Cove lighting offers a soft, ambient glow ideal for creating a warm atmosphere and enhancing architectural features. But it’s more complex to install. Conversely, recessed lighting provides a sleek, modern look with focused illumination suitable for tasks and can be used in various settings. But it requires sufficient ceiling space and is typically easier to install during initial construction or major renovations. The best choice depends on the desired ambiance, the specific use of the room, ceiling architecture, and energy efficiency considerations, with many opting for a combination of both to achieve a versatile and layered lighting effect.
Cove and Recessed Lighting Ideas
Here are some ideas for integrating both cove and recessed lighting into various spaces:
Cove Lighting Ideas:
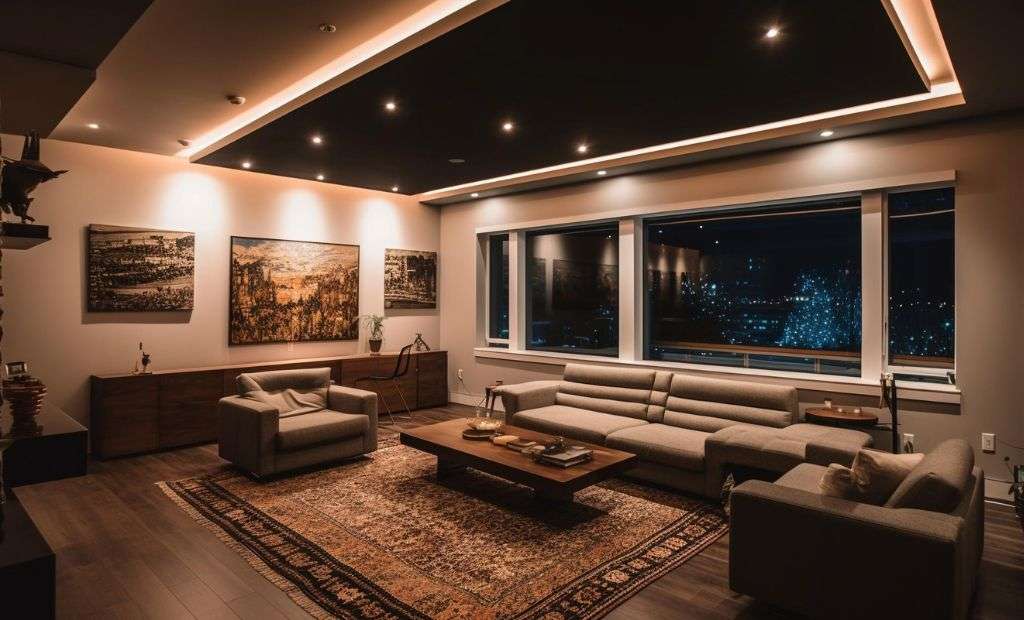
- Living Room Ambiance: Install cove lighting around the perimeter of the living room ceiling or behind valances to create a warm, inviting glow that enhances the room’s coziness.
- Accentuating Architectural Features: Use cove lighting to highlight interesting architectural details like coffered ceilings, archways, or art niches.
- Bedroom Relaxation: Install it around the headboard or ceiling perimeter in a bedroom to provide a soft, ambient light that’s perfect for unwinding.
- Dramatic Hallways: Run cove lighting along the length of a hallway ceiling or upper wall to create an elongated effect and add a touch of drama.
- Under Cabinet and Shelving: In kitchens or libraries, use cove lighting under cabinets or shelving to softly illuminate work areas or display items.
Recessed Lighting Ideas:
- Kitchen Task Areas: Place recessed lights over kitchen counters, sinks, and islands to provide clear, bright light for cooking and preparation.
- Focused Artwork Lighting: Aim adjustable recessed lighting at walls to highlight paintings, photographs, or sculptures.
- Bathroom Illumination: Install recessed lighting in showers and over vanities for clean, unobtrusive lighting that’s practical and stylish.
- Home Office Productivity: Use recessed lights in a home office setting to ensure adequate illumination for tasks, avoiding shadows and glare on screens.
- Outdoor Enhancement: Incorporate recessed lighting into outdoor eaves, porches, or decks to extend living spaces into the evening with well-lit, inviting areas.
When combining both cove and recessed lighting, consider using cove lighting to provide a soft, ambient backdrop while employing recessed lighting for task and accent purposes. For instance, in a living room, cove lighting can offer a gentle luminosity around the room’s perimeter while recessed lights can focus on seating areas, artworks, or reading spots. Always ensure that the color temperature and brightness of both lighting types are compatible to create a cohesive and harmonious lighting effect.
Conclusion
Both cove and recessed lighting can dramatically enhance the look and feel of a space. While the installation of both can be a DIY project for those with some experience, it often involves complex electrical work best left to professionals. Whether softening a room’s ambiance with cove lighting or focusing light on a workspace with recessed lighting, these solutions offer versatility and style. Always plan carefully, follow safety guidelines, and consider consulting with a lighting expert or electrician to achieve the best results. With the right approach, you can transform any space into a beautifully lit environment. For more such informative posts, do check out Indoor Glow.
[…] Recessed lighting fixtures are installed into the ceiling, offering a clean and streamlined look: […]
[…] Recessed lighting, also known as can lights or downlights, is installed into an opening in the ceiling. It’s flush with the ceiling surface, providing a clean, streamlined look ideal for modern interiors or rooms with low ceilings. It’s versatile for ambient, task, or accent lighting. […]
[…] choice for homeowners for its sleek, modern look and ease of installation. Unlike traditional recessed lighting, which requires a metal can to be installed in the ceiling, canless lights are housed directly in […]